
|
Product Details
Home>
Product Details
|
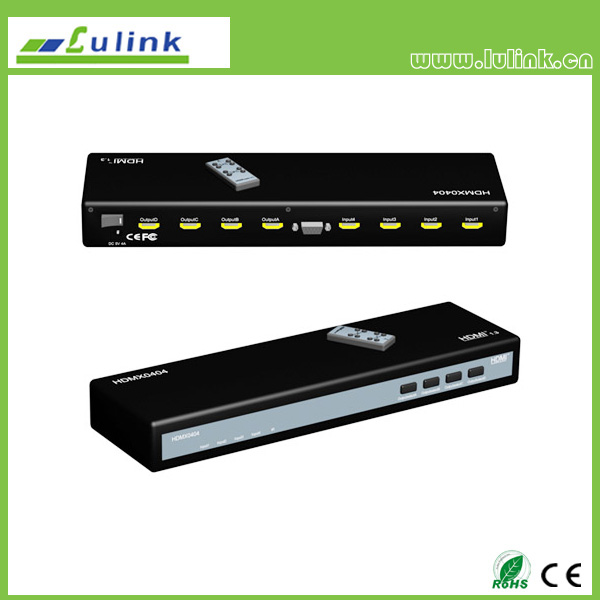
4*4 HDMI Converters
- Product Introduction
Number:: LK-HDMA44
INTRODUCTION
Dear customer
Thank you for purchasing this product. For optimum performance and safety, please read these instructions carefully before connecting, operating or adjusting this product. Please keep this manual for future reference.
Our series of HDMI switchers, extenders, matrixes and splitters are designed to make your A/V device use more convenient, more comfortable, more productive and more cost-efficient.
The 4x4 HDMI Matrix can use four HDMI sources to four HDMI sinks. The matrix allows four HDMI devices to be switched or split easily to four HDMI compatible monitors or projectors. The Matrix can also be placed at the end of a long HDMI cable to regenerate the HDMI signal.
Our devices offer solutions for noise, space and security concerns, data center control, information distribution, conference room presentation, school and corporate training environments.
FEATURES
l Four HDMI input signals switched or split to four HDMI sink devices
l Support CEC
l Support deep color 30bit, 36bit
l Support Blue-Ray 24/50/60fs/HD-DVD/xvYCC
l Digital audio format, as DTS-HD/Dolby-trueHD/LPCM7.1/DTS/Dolby-AC3/DSD
l Support signal retiming
l Support input up to 15metres AWG26 HDMI standard cable length, output up to 25metres AWG26 cable length
l Inputs can be switched with the IR remote control,also can be controlled by four buttons.
l Serial RS-232 remote port
l It can smartly jump over those input sources which are not connected.
l No loss of quality
l Installs in minutes
l Need DC5V/4A power supply
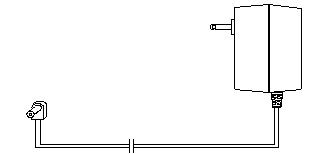
The accessories with the machines lists as picture:
1、5V Power Adaptor
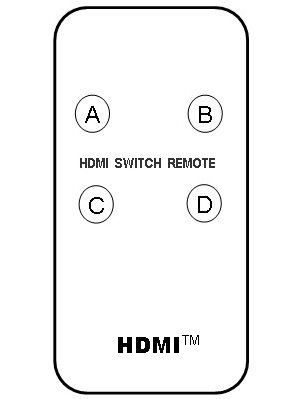
2、Remote
3、one pc of Manual
Power Adaptor
Remote
Physical Connection Showing Picture

Figure 1.0 Front Panel Showing Picture
Input 1- Input 4: HDMI input led status light
IR: IR receiver
LCD: Digital Tube Showing
Switch A: HDMI A output switch button
Switch B: HDMI B output switch button
Switch C: HDMI C output switch button
Switch D: HDMI D output switch button

Figure 1.1 rear panel showing picture
DC 5V: 5V DC-DC Power Interface
Switch:Power Adaptor led status light
Output D:HDMI D output interface
Output C:HDMI C output interface
Output B:HDMI B output interface
Output A:HDMI A output interface
R232: RS232 communication port
Input 1- Input 4:HDMI input interface
Operating and Connecting:
1. Connect one cable from each HDMI source devices into HDMI Matrix inputs.
2. Connect one cable from each display (monitor or projector) into the HDMI Matrix outputs.
3. Connect 5V power supply to the HDMI 4x4 Matrix.
4. Alternatively, use an RS-232 control system to switch between sources.
SPECIFICATIONS: LK-HDMA44
HDMI resolution ………………………....24/50/60fs/1080p/1080i/720p/576p/576i/480p/480i
Support video color format …………………………..…………….24bit/deep color 30bit,36bit
Support audio format……………….DTS-HD/Dolby-trueHD/LPCM7.1/DTS/Dolby-AC3/DSD
Max bandwidth…………………………………………………………………………….225MHz
Max baud rate…………………….………………….…………………………………..6.75Gbps
Input/Output TMDS signal ………….…………………………..………...0.5~1.5Volts p-p(TTL)
Input/Output DDC signal ……………………………………………..………… 5Volts p-p (TTL)
Input cable distance..…... ………………………. ….…..≤15m AWG26 HDMI standard cable
Output cable distance……………………………….…...≤25m AWG26 HDMI standard cable
Max working current…………………………………………………………………………...2.6A
Power adapter format………………..Input:AC (50HZ, 60HZ) 100V-240V; Output: DC5V/4A
Operating Temperature range……..…………….………………………………… (-15 to +55℃)
Operating Humidity range………………………….….……….5 to 90%RH (No Condensation)
Dimension (L x W x H) …………………………….…………………………380x140x60 (mm)
Weight…..………………………………………………………..…….………………………1900g
RS-232 INTERFACE

Binary Table
ASCII | Select output | Note |
1 | A | Send A's ASCII code to control the input source OutputA |
2 | B | Send B's ASCII code to control the input source OutputB |
3 | C | Send C's ASCII code to control the input source OutputC |
4 | D | Send D's ASCII code to control the input source OutputD |
RS-232 Setting:
Bits per second .........................................................................................................9600
Data bits ........................................................................................................................ 8
Stop bits ..........................................................................................................................1
CRC bits………………………………………………………………………………………None
Flow Control .............................................................................................................. None
IR Remote Operating Instruction
1.Firstly remove the plastic film in the rear board of the remote board.
2.The A, B, C, D signifies the A, B, C, D output.
3.If you want to select the Signal source to output A, press the A key directly. Repeat pressing the A key can switch the signal to the output. For Example,if you like to switch the input 2 hd source to output A,only press the "A” key repeatedly until you see the LED tube showing "2".
4.The plastic film is strongly advised to remove it when the remote is not used for long time.
Notes:
Pls use the machine as the instruction listed to keep the long use lifetime of the machine.
1. The machine should be placed at the spot far from the Damp, High-Temperature, Dusty, Erosive, and oxidative environment.
2. All parts will be free from the strong shake, hit, fall.
3. Touching the power adaptor with the wet hands is prohibited.
4. Pls hold the power adaptor head and do not pull the power cord when cut off from the socket.
5. Pls turn the power off when the machine is not used for long time.
6. Pls do not open the cover and do not touch the inside parts.
7. Pls use the original factory power adaptor.
Before power on, pls check the connection line carefully. And make sure that all interfaces are normally connected. The common trouble shooting way shows below:
Serial NO | Trouble Description | Cause and Ways to deal with |
1 | Non-Power-Connected | 1、Check if the power adaptor head is truly and correctly inserted the power socket. 2、Check the power switch if it is in on status. |
2 | No Picture | 1、Pls to make sure that the TV is on and has been connected with the machine. 2、To check if the signal source is on and well connected. 3、Check the system connection quality. 4、Check if the line is all good quality. 5、Check the cable quality |
3 | Obscure Picture | 1、To try again to connect the cable to be free from the unsuccessful connection. 2、HDMI Cable Quality |
4 | Remote | 1、Pls check if the film that stops the current has been taken out. 2、To check if the remote battery is working full. |

HELPLINE
+86-20-87645225
lulinkinformation@lulink.cn
ADD
3F, 2193# ,Guangyuan East Road, Guangzhou, China